Find Form

You use the Find form to open existing student records. To open the Find form, click the Find button (the binoculars) on the toolbar:
toolbar
The Find form looks like this:
Find
If you know a student’s PIN or Association ID, you can simply type that in and press the Find button (on this form, the  binoculars) and it will open that student for you.
You can also search for a student using the First and/or Last name boxes. Type in the first part of that name, click the Find button, and in the box you’ll get a list of every student that matches what you entered. Double-click a name in that list and MasterVision will open that student.
You don’t have to do both First and Last names and you also don’t have to enter a full name. Some examples:
  • You can enter just “A” in First name and it’ll find every student whose first name starts with A.
  • You can enter just “S” in Last name and it’ll find every student whose last name starts with S.
  • You can enter “A” in first name and “S” in last name and MasterVision will find all students who meet both of those criteria.

Attendance

Before you can start entering attendance, you have to enter your students and setup your class schedule. With that done, you can start taking attendance. On the toolbar, click the button “A” button to take class attendance. The toolbar looks like this:

toolbar

Clicking the A button opens the Attendance form:

Attendance

Date: Today’s date has already been entered, but you can change it if you need to.
Class: The classes available for this date are shown here. If something is wrong, you can add/edit to the class list at File > Open > Attendance > Classes.
Instructors: Select the employee that is teaching the class. Employees are setup at File > Open > Employees.
Next you have to select the students that are attending this class. There are several ways to do it:
Enrolled: The Enrolled list gives you a list of students that you indicated should be in this class. You can double-click a name in the list to move the student to the attending side (and double-clicking on the attending side will move them back). A student will appear in this list if you selected this class for them on the Student form, Classes tab.
PIN: The PIN section will let you type in a PIN number to add a student Attending section. If you don’t know the PIN numbers (and you probably don’t), you can double-click the underlined “PIN” label to open the Quick Find form:
FindStudent
On the Quick Find form, you can lookup a student by First or Last name (just type in a couple letters, you don’t have to do the full name, then press enter). A list of matching students will come up. Double-click on the student you want put that student in that class.
Warning Messages: You may get a warning message as you add a student to the attending list. MasterVision warns you if their is a situation where you might now want that student attending class (expired contract, hasn’t attended in two weeks, has money due, etc.). You can just OK those error messages for now.
When you’re all done with Attendance, click the green checkmark to show that you are done. The attendance screen will close and you’ll get the option on whether or not to print the instructor’s report.
You can now start taking attendance for all of your classes.

Entering Students

To add students, you go to the Find form. On the toolbar, click the binoculars button:
toolbar
That opens the Find form which looks like this:
Find
Most of the time you’d use the Find form to lookup a student. You’d enter something in first name or last name and click the Find button. But, we haven’t entered any students yet so nothing cool will happen if you try that.
To enter a new student, you click the Add button (the plus sign). That will open the student form that looks like this:
studentTab1
We’re ready to start entering our first student! There’s a lot of information there. If you don’t have some of that information, don’t worry about it. You can leave it blank for now and do it later. Here’ s some help on entering information on this first tab:
  • PIN: Is an ID number that MasterVision assigns automatically. I’d recommend you leave it alone.
  • Status: The Student form is used both for Students and Prospects. Since we are entering students, set the status to “A” for active student.
  • Assoc: Is for any association ID, if you have one. If you don’t, leave it blank.
  • Picture: That big X box is where a picture of a student would be shown. Let’s deal with pictures in a later email so don’t worry about it.
  • First, Last: I think you know what to do there
  • Salutation: The name that appears on a letter after the Dear —, part. If they have a nickname or something they prefer, you can enter that here.
  • Address: The full name you’d put on an envelope. MasterVision defaults in what you typed for first & last. You can get fancy and put a Mr. or Ms. on that if you want, or just leave it.
  • Address, City, State, Phone, Email, Birthday: If you have this information, great, go ahead and enter it. If not, leave it for now.
  • Last Contact, Callback, Bookmark: Ignore all of these for now.
Once you have the above information entered, click on the Student tab. You should see this:
StudentTab2
We’re not going to enter much on this tab. Ignore everything except the following:
  • Exam section, Next Exam: We want to enter a date here. Take your best guess at what the date would be for this student’s next exam.
  • Rank: Enter the student’s current rank
  • Stripes: If you do stripes, enter them here. You’ll have to right-click it to set up the stripes you use.
Everything else gets ignored for now. Click the Classes tab. You see this:
StudentTab3
We need to put the students in the classes he attends. Double-click the class in the “Classes” section to move them to the “Enrolled In” section. Put the student in every class they could potentially comes to. (If you put them in the wrong one, you can double-click in the Enrolled In section to move that class back to the Classes section).
Ignore the Groups and Intros at this point. We’ll also ignore the Contacts tab at this point. All of that you can come back to do later if you want.
That’s it, you’ve entered your first student! Congratulations! Click the X in the upper right of the student form to close the student. All of your information is saved automatically.
You’re now back on the Find form where you can click the Plus button again to add another student.

Class Schedule

MasterVision needs to know about your class schedule. You can open the Class form from the menu at File > Open > Attendance > Classes (or double-click the Setup Classes in the Getting Started window). It looks like this:
classes
Description: Is simply the name you give the class. It can be anything you want.
Day & Time: Are the day and time this class occurs.
Type: Is a list that you can setup to be whatever you want. It comes in handy later on when you’re running reports. To change this list, right-click it. You can then setup whatever types you want. But, Todd, you’re wondering “What types do I want?” Here are some ideas:
  • Maybe you have adult & child classes that you want to track separately? Setup a type of Adult and one of Child.
  • Maybe you have a Regular class and a Weapons class you want to track?
  • Perhaps you have multiple styles of martial arts and want to track them separately?
  • Maybe you just don’t care about that at all. That’s fine, leave it blank. You can always change it later if you want.

Next: Enter Students

Ranks

You’ll need to tell MasterVision about the rank structure you use in your school. You access the Rank form from the menu in MasterVision at File > Open > System Setup > Ranks (or double-click the Setup Ranks in the Getting Started form). It looks like this:

ranks

Name: Is just the name you want to give your rank.

Order: Is the numerical order this rank should be put in. So if White belt is your first rank, you put in a 1. If Yellow is your second rank, put in a 2. Simple enough. If you have multiple belt systems, just separate them numerically – for example: If you have kids’ belt and adult belts, the kids’ belts might be order 1-8 while the adult belts are order 10-22.

Lessons Required to Test for Next Rank: This is how many lessons a student has to take before he can take his next exam. If you set this, when you ask MasterVision who is ready to test, it can optionallyl exclude the people who have not had the required number of lessons. If you don’t care about this, just leave it at a 0.
Weeks until Next Test if Student: The next three entries determine when a student’s next exam will be when you’re recording the current exam. For example: if I’m currently a white belt and I pass my white belt exam making it to yellow, how many weeks will it be until I’m ready to take my yellow belt exam? Set this however your school does it. Maybe at the beginning, a student is ready for their next test in 4 weeks. Maybe at a higher rank, the next test wouldn’t be for 6 months (24 weeks). Quick explanation on the three fields:
  • Passes: If the student passes the current exam for this rank, when is their test for the next rank?
  • Fails: If the student fails the current exam, when would they retest for this rank?
  • No Show: If the student is a no show for the current exam, when would they retest for this rank? This might be the same as fails which is fine.

Cities

So that you can quickly enter an address, MasterVision will let you select a city from a list rather than typing in the same city names over and over. This works just like phone types does:
1. Double-click on the Setup Cities item in the Getting Started form (you can open the Getting Started from the menu at Tools > Getting Started).
2. Click the New button and enter your city name in the grid.
Maybe you’re in a small town and you’ll only have students from your city. That’s fine – you just enter that one city name here. Maybe you’re straddling a suburb in a big city and there are 4 or 5 different city names a student might have – that’s fine as well, just keep clicking New and enter them all here.
Next: Ranks

Phone Types

MasterVision allows you to have up to 3 phone numbers per student and each of these should have a “type” – home, work, etc. Rather than typing those names over and over, MasterVision let’s you enter them once and then just pick from a list.
1. From the Getting Started screen, double-click on Setup Phone Types. (You should see the Getting Started screen when you start MasterVision. If not, you can open it from the menu at Tools > Getting Started. Alternatively, on the student screen you can right-click the phone type field.)
2. This will open the phone setup screen that looks like this:
PhoneTypes
3. To add a New phone type, click the New button and then, in the grid, type in the phone type that you want. To enter more, click New again and enter in the grid. If you get one you don’t want (or a blank one), click on it in the grid and then click the Trashcan button to delete it.
Now, you’re probably asking yourself, “What phone types should I enter?” That’s up to you. Maybe you’ll want Home, Work, and Cell phone types. Maybe you’re never going to call someone at work, so you’ll just have Home and Mobile. It’s completely up to you how you want them to read.  (Don’t include a “Mom” or “Parent” phone type – you set those up in Contacts, which we’ll cover later.)
Whatever you decide, enter those and then click the X in the upper-right corner to close the form. Your changes are saved automatically.
Next: Cities

Growing Your Dojo -#2 Sales

(This is a series of blog posts following along with Michael Massie’s Growing Your Dojo series of emails and how MasterVision can help with each of the steps. You can sign-up for Mike’s daily email list here.) Let’s talk about Step #2:

Step #2 – Sales. Learning how to turn those leads into students, consistently. Often a skipped step, which leads to school owners wasting a lot of marketing dollars.

While MasterVision can’t make the sale for you, it can certainly help you be more successful at it. This previous post showed you how to use MasterVision to track your introductory lessons. That’s the important first step for you – actually track what is happening to your prospects – are they being called? is an intro appointment being scheduled? did the prospect show up? was a second intro appointment scheduled?

Once you’re doing that, MasterVision can measure your progress, and, as the old adage goes “what gets measured, gets done”. You can then use these MasterVision reports to see how you are doing. Run the Activity, Infocall History: By Inquiry Date report to see the prospects you got over a date range, whether they were called, had intro appointments, or eventually enrolled. Use this to make sure you’re following up with your prospects.

To help improve your sales, communication with the prospect is key. MasterVision quickly and easily lets you communicate with a prospect by email, text, or by creating mailing labels. Consider doing any of the following to let the prospect know you are excited to have them join your school:

  • Send a email/text/postcard thanking them for showing interest in your school
  • Send an email with a “Welcome to our School” PDF that highlights your school
  • Send an email answering frequently asked questions about their upcoming intro appointment
  • Send a text reminding them of their intro appointment and that you look forward to seeing them
  • Send a email/text thanking them for attending the intro
  • If they don’t enroll, send further communication to try and get them back for a second into

So to recap how you can improve sales:

  • Use MasterVision to track what you’re doing so that you stay on top of things
  • Use MasterVision to communicate with the client, put your marketing materials in their hand, and to build their excitement and interest
  • You teach a great introductory lesson when they come in

Do those things, your sales rate will increase, and you’ll have a more successful school.

Next: Using MasterVision To Increase Retention

Growing Your Dojo – #1, Grab Bag

(This is a series of blog posts following along with Michael Massie’s Growing Your Dojo series of emails and how MasterVision can help with each of the steps. You can sign-up for Mike’s daily email list here.) We’re talking about Michael’s Step #1:

Step #1 – Lead generation. Minimum 30 leads a month, generated from multiple sources, so if one source dries up (think “internet marketing changes every five minutes” here) you still have a dozen other lead sources bringing you new prospective students.

We talked specifically about Sources and Introductory Lessons in MasterVision help you deal with the prospects you gained from your lead generation. Below is a simple list of other things MasterVision can do that help with this as well. If you don’t know what these things are or how to use them, get in touch with me!

  • MasterVision categorizes your leads as Prospects (Status code  = “P”) and Open Prospects (Status Code = “O”). A Prospect is a lead that you’re actively trying to turn into a student. An Open Prospect is one that you have maybe given up on. MasterVision will automatically change a “P” lead to an “O” after 6 months. You can change that time in the Tools > Options.
  • The Infocall History report will show you how many leads you entered into MasterVision, whether they had a callback, did they make an intro appointment, did they attend that appointment, and did they enroll. Use this report to make sure you’re following up with all the leads you paid to get.
  • The Source report will show you, for each of your sources, the cost to get a lead and the cost per enrollment. Use this report too see what marketing sources are working the best for you.
  • Use the Appointment Book to track what intros you have for a day and what callbacks you need to make.
  • From the Student form you can email or text a prospect. Use this to quickly and easily stay in touch with your leads: Remind them of their upcoming intro appointment, send them instructions on what to expect/wear for an intro, or an introductory brochure for your school.
  • The Message function let’s you create standard email or text messages to send to a lead. Don’t type it out every time!
  • The Selector will let you create mailing labels for Prospects and/or Open Prospects. Send postcards to your prospects about upcoming school events or special offers for enrolling.

Next: How MasterVision Helps with Sales

Growing Your Dojo – #1, Intro Lessons

(This is a series of blog posts following along with Mike Massie’s Growing Your Dojo series of emails and how MasterVision can help with each of the steps. You can sign-up for Mike’s daily email list here.)

Last time we looked at #1 – Sources and how MasterVision can track the performance of your various marketing. Today let’s talk about intro lessons (or maybe you call them intro appointments) and how it applies to Michael’s #1 – Lead Generation:

Step #1 – Lead generation. Minimum 30 leads a month, generated from multiple sources, so if one source dries up (think “internet marketing changes every five minutes” here) you still have a dozen other lead sources bringing you new prospective students.

Now that you have those leads, you want to turn them into students. You’ll probably do that with an intro lesson and MasterVision is going to help you schedule those, follow-up with them, and alert you to missed intros.

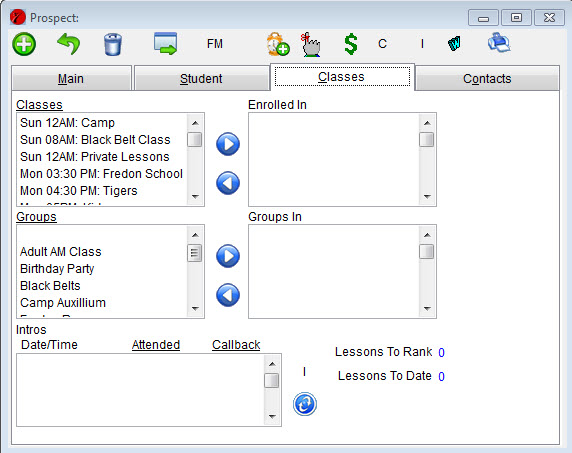
First off, you schedule an intro lesson on the Student screen in MasterVision on the Classes tab. It looks like this:

StudentIntros

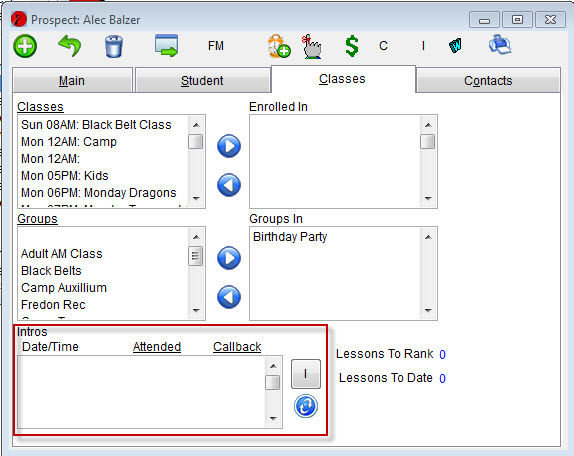
You click the “I” button to create a new intro appointment for this student. This gives you the intro screen:

IntroSchedule

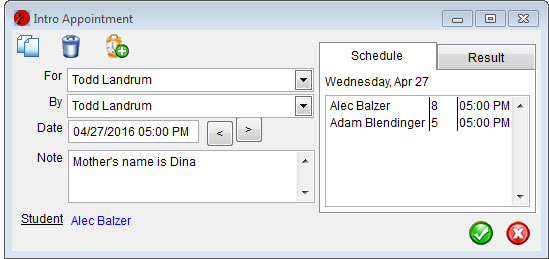
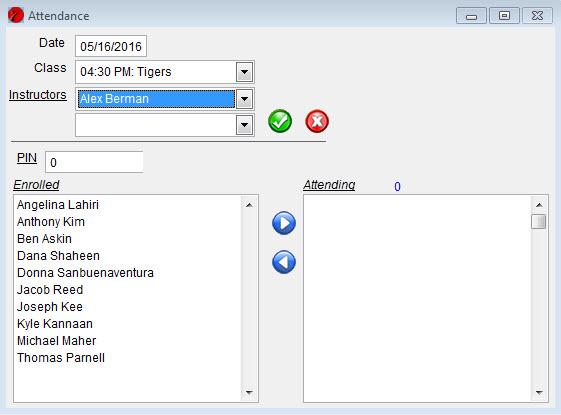
You schedule the appointment on the left-side: The person this going to teach the intro, the person that scheduled the appointment, the time&date of the lesson, and then any notes with the intro (that’s darn handy, huh?). On the right-side, it shows you any other intro appointments you have scheduled, the age of the person coming in, and the time they are coming in. You can use that to group your intros together.

After the intro is done, you’ll want to record the result of the intro. You can go back to the prospect screen, click on the intro appointment, and see that same intro screen above. You go to the Result tab and record whether or not the intro showed up and the employee who taught it. If the lead was a no show, you can also schedule a phone call to try to get them in a second time.

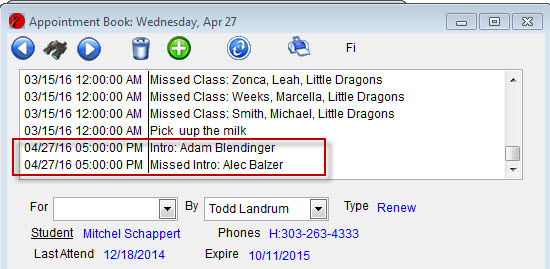
All of this information ties together with the appointment book. The appointment book shows you all of the intros you have scheduled for a day as well as showing you any missed intro leads that you need to call back.

AppointmentBookIntro

So there you have it. MasterVision helps you schedule your intro appointments, keeps track of those appointments, and helps you schedule follow-up for leads that attended or didn’t attend. Easy & straight forward.

If your school is going to be successful, you’ll need to be generating leads. Don’t let the leads fall through the cracks.

Next: Other Ways MasterVision Helps with Leads